A tour of my ever growing Honeycomb Storage Walls
3D Printing and Me
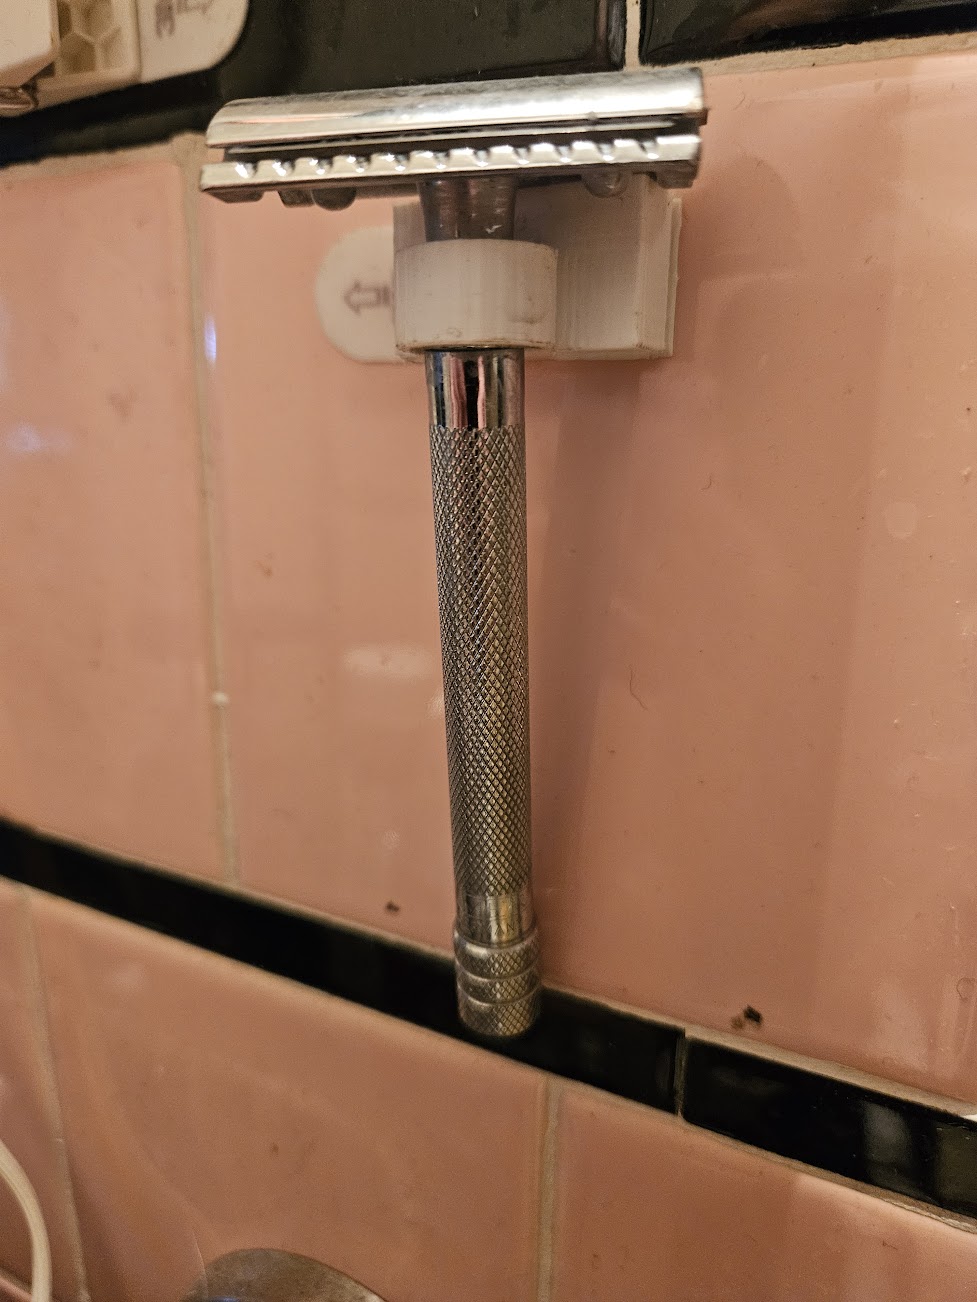
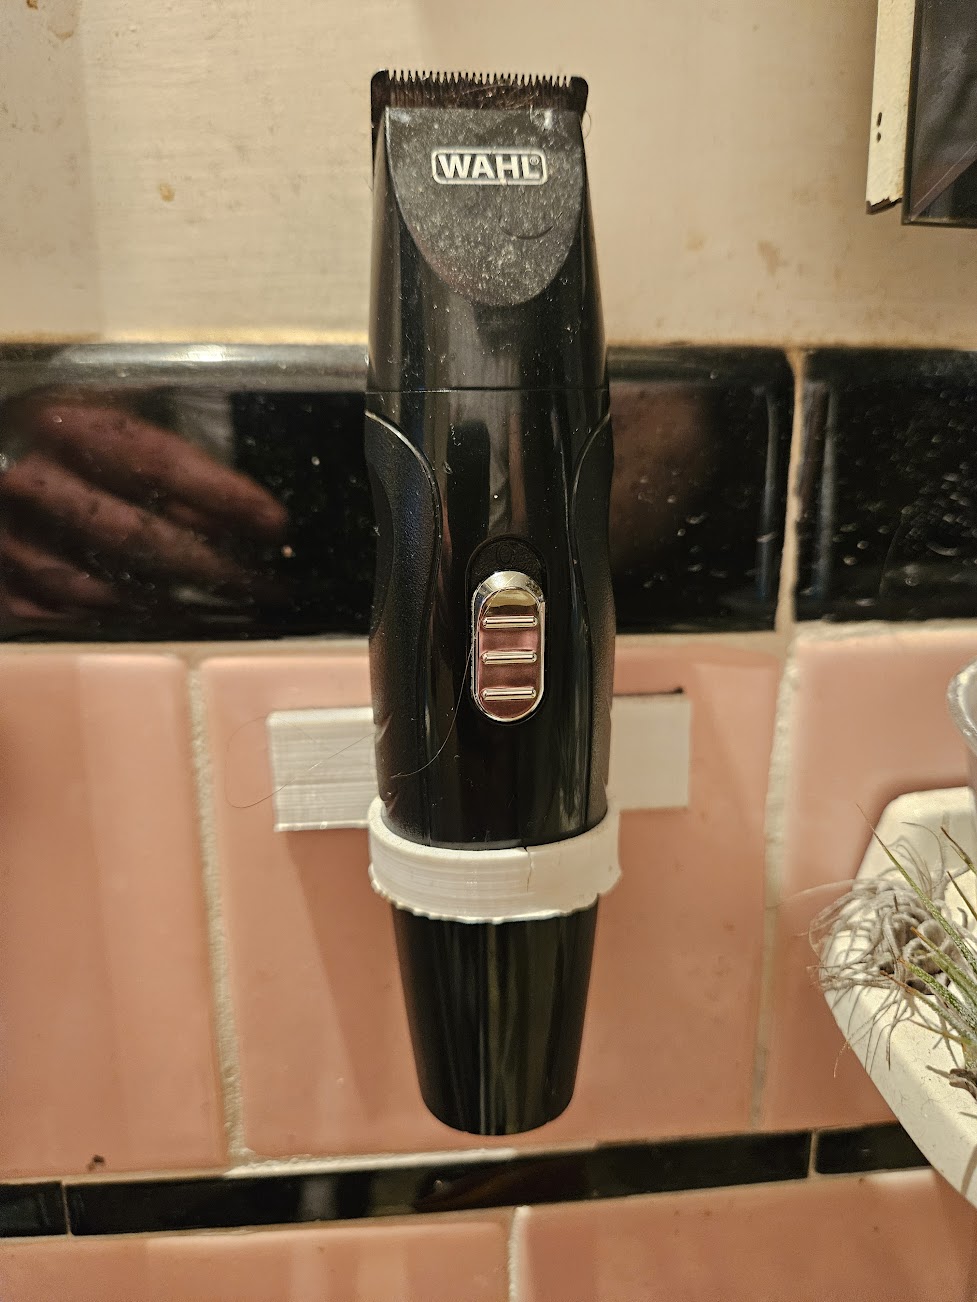
I never really intented to get into 3D printing. While I thought it looked "cool", most of the printing I saw online was figurines and trinkets, not stuff I really needed in my life. Sometime in 2019, a friend left an old ADIMLab Gantry Pro at my house. We set it up and printed out a little pixelated octopus. I printed out a few more trinkets and left the printer to sit. But then one day I needed a wall mounted holder for my safety razor and then I made a similiar holder for my buzzer. This is where 3D printing really started to click for me, I could make custom solutions to solve very personal problems.
There were problems with the ADIMLab though, it required constant bed leveling and I was using a specific version of Cura with a profile that was given to me. I had no idea how it worked. Any given print could work the first time or take hours of bed level and first layer tests. So I can't really say I ever made anything too complicated with the ADIMLab. I started exploring ways to improve the ADIMLab with new 3D printed parts, but when you have to fix the printer after every print you don't get very far. I got lucky tho and was gifted a different 3D printer, the QIDI TECH I. This was a huge improvement and I moved the ADIMLab up to my attic (BTW, I'm currently trying find someone to give the ADIMLab printer to, if you live in Central MA and have a motivated teenager or young adult in your life who might like to put the work in to make this thing work better, email me).
The QIDI also had issues, it was a MakerBot clone and relied on a specific outdated version of the MakerBot slicer. I tried many times to create a custom CURA profile for it, but I could never get it right. I barely ever had to level the bed on the QIDI tho and it worked well enough. I hummed along with it until last year when the bed broke in an unrecoverable way. I needed a new bed and finding the proprietary bed for this printer proved to be a challenge. After 4 years of free rides, I decided it was finally time to buy a 3D printer myself.
After doing a lot of research, I purchased a Prusa i3 MK3S+ Kit. I decided on the MK3S+ due to it's large community, availability of parts and the great documentation provided by Prusa. I built the MK3S+ on the day I turned 32. It took me about 9 hours, though I suspect it would have been quicker if I hadn't been drinking beers and watching Law & Order while assembling it. The process of building the printer was so important, I now felt an understanding of 3D printers that I never had before. After completeing the MK3S+ I ran all of the calibration and set the z-offset. I printed my first Benchy and it was near perfect, I was blown away by the new world of 3D printing I had just entered into.
Enter the Honeycomb Storage Wall
Now that I had a serious printer it was time to solve a serious problem, tool storage! For years my workshop tables had been a mess. Tools strewn everywhere, you can never find what you need. I initially solved this problem with pegboards. I mounted them onto the walls behind my desk and got a bunch of different holders. This helped but it wasn't enough. I have never found pegboards to be very good. The holders are never quite right for the tool you are trying to hold, they often slip off the wall and the spacing of the holes on the pegboard doesn't lend itself to efficient usage of space.
Initially, I thought I was going to be printing off a bunch of pegboard holders, indeed there are a ton of them online. This all seemed well and good, but something stood out to me, pegboard holders just aren't designed to be easily 3D printed, they often require support and even then, the models I printed often suffered from the "it falls out when you pick up the tool" issue. While searching for pegboard models, the IKEA SKADIS system came across my radar. There are a ton of models for those too.
The Skadis system looked interesting and I considered purchasing a few of the panels. But then while cruising Printables, I came across the Honeycomb Storage Wall (HSW) system. Designed with 3D printing in mind, I was super impressed by the system itself and the community around it. There are tons of HSW components out there and even better, it is usually very easy to take an existing model and mod it to work with HSW. With all this excitement I printed up my first wall.
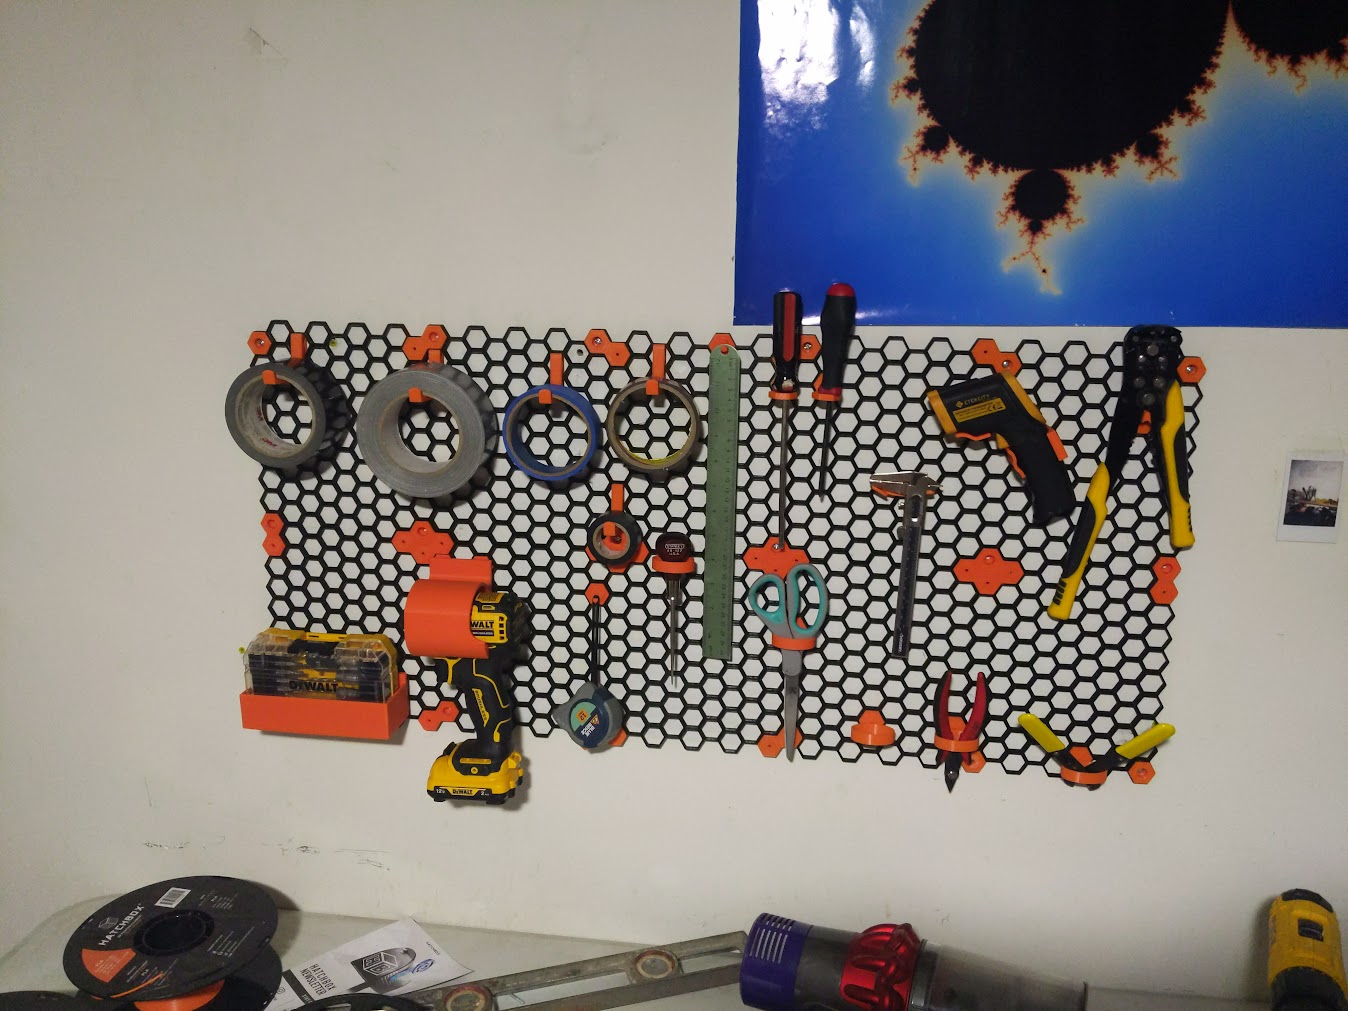 My first tool wall which replaced two pegboards and held way more stuff than those two pegboards.
I loved the result. In the summer of 2023, I took off a week of work and remodeled my office, painting the walls, rearranging things and printing about a million HSW panels and accessories.
This document serves as a compendium of the walls and what is on them. As time passes I will update it to reflects sucesses and failures. At the time of writing this, the walls below are all 6 to 10 months old. They are all printed in PLA and I have had no issues with the PLA aging thus far, I will be sure to update if the panels begin to fail, but based on the lifespace of other PLA objects in my house, I don't expect them to fail any time soon.
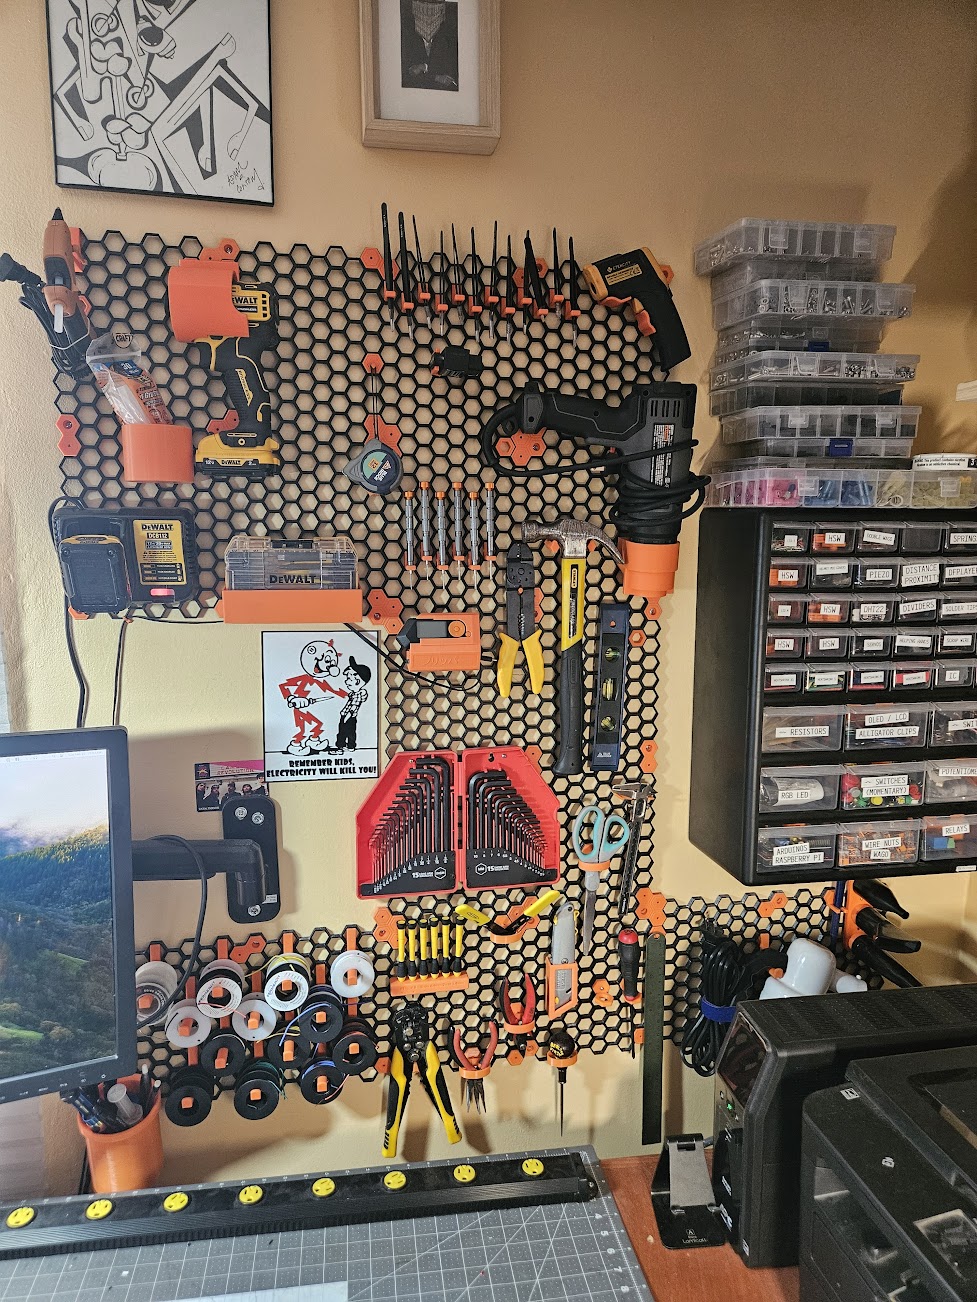
Tool Wall #1
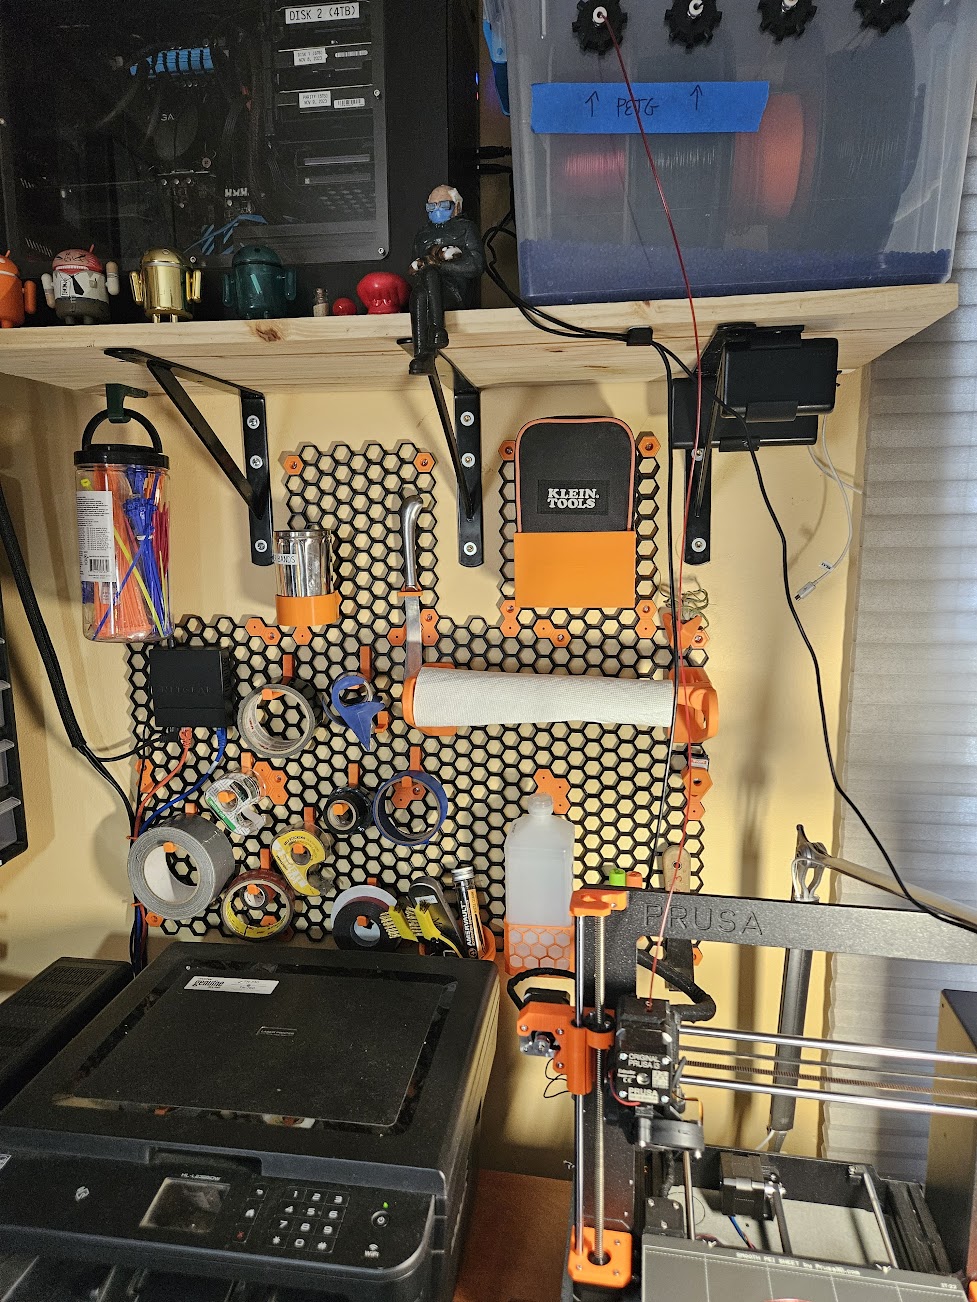
This wall consists of 10 panels, 8 single mounts, 12 double mounts, 3 quad mounts
Easy Print Super Strong Hook - Single Piece - No Screws - No Supports - HSW Honeycomb Storage Wall: These are the hooks holding all the different rolls of tape you see on the wall. Loves these things, really versatile and strong.
HSW Square Basket: Gotta have IPA next to the printer.
Print-in-place HSW "Quickreload" paper towel holder: And you gotta have paper towels to wipe it off!
Cup Holder and Cup for Honeycomb Storage Wall: This cup holds a punch of 3D printer maintenance tools. It's nice because it is held up by a ring and you can take the cup out. I would like a version of the ring that attaches to multiple points on the wall as I occasionally pull the whole thing off when removing the cup.
Airplant and Succulent Wall Planter: This holds the air plant in top right. I soak it in water once a month and it's been growing!
Smaller Double Glue Stick Holder - HSW: I use glue on my smooth printer sheets. I have about 50 glue sticks in storage, so i kinda want to make 24 more of these.
Butterknife Holder: This is a model I made, I need to upload it. My HSW parts fit tight and I use a butter knife to get them off. This is the level of tightness I want BTW.
Multimeter Holder: This is another model I made. It's just a box that is attached via two inserts.
Honeycomb Storage wall scrapper NEW and IMPROVED: This is obscured in the photo but it's right behind my printer holding a paint scraper.
SD-card-holder for 3, 5 or 7 SD cards for Honeycomb storage wall: Holds SD cards used for printing.
HSW Cup Holder: This cup is holding the metal cup in the upper left panel. This print is way shorter than anything on the linked printables page, meaning I must modded it without actually saving the STL or uploading it anywhere :O
Network Switch: I mounted this switch to the wall by taking it apart and screwing it to some single point inserts.
Tool Wall #2
This wall consists of 18 panels, 7 single mounts, 14 double mounts, 9 quad mounts
Easy Print Super Strong Hook - Single Piece - No Screws - No Supports - HSW Honeycomb Storage Wall: Once again we see the "super strong" hook in several places, I love this model. It's holding my glue gun, all my spools of wire and my datavac in the bottom right corner.
HSW Cup Holder: This holds my glue gun sticks.
Easy clip on Screw driver holder - HSW Honeycomb Storage Wall: Another great clip on hanger. These are used to hold my torx screw drivers and tweezer sets.
HSW Ruler Hook: Doing trip duty holding my measuring tape, ruler, level and the crimp tool I have handing to the left of the hammer.
Porter Cable Heat Gun PC1500HG Holder - Honeycomb Storage Wall: There are a million heat gun HSW holders out there but none of them fit my particular heat gun, so I made this one.
DeWalt DCB112 Charger Mount - Honeycomb Storage Wall: This is a model I made so I could mount my DeWalt battery charger on the wall. Normally, I'm not shy about drilling holes into stuff I want to mount, but in the case of this battery charger I didn't want to mess anything up inside it. I was able to find a similar model to base my dimensions for the mount point on which was nice.
Stanley 66052 6-Piece Precision Screwdriver Set Holder - Honeycomb Storage Wall: Another creation of my own, a holder for a very specific set of stanley screw drivers.
Stanley 10-499 Utility Knife Holder - Honeycomb Storage Wall: Made this to hold a specific utility knife, it has been cool seeing people print it and show that other knifes fit on Printables.
Cup Holder and Cup for Honeycomb Storage Wall: Another one of these in the bottom left. Holding pens, pencils and some soldering stuff.
HSW - Side Mounted Holder for Dewalt Cordless Drill and Impact Driver : Drill holder. So nice to have a downstairs drill and an upstairs drill.
DeWalt ToughCase+ Holder - Honeycomb Storage Wall: Holding my drill bit case from DeWalt. This is a model I made, it's just a box hooked to some insert-with-M3
Etekcity IR Thermometer Holder - Honeycomb Storage Wall: Holding my IR Thermometer in the top right. This is one of the first "remixes" I did to another persons model to make it work with the Honeycomb Storage Wall. I normally make models in OnShape but if I am editing an STL I usually do it in Blender. I'm still pretty bad with Blender but it makes this sort of thing easy.
DataVac Accessories Holders - Way on the far right are the different tubes that can go on the DataVac (which by the way is sweet, if you are buying canned air a lot check it out). This is a model I made but I haven't uploaded it yet.
Wire Stripper Holder for Hexagon Storage Wall (HSW): Holding my wire stripper in the bottom middle.
HSW Parametric Hammer (or other tool) Holder: Holding my hammer. I would like to mod this someday to make it attach to the wall at multiple points. The hammer is heavy and I have accidentally pulled the holder off the wall when picking it up and putting it away.
Flipper Zero Desktop Stand - Honeycomb Storage Wall: Remix of a sick Flipper Zero holder.
Car Computer Error Reader Holder: This is underneath my tweezers in the top middle. The car reader is one of those accessories that I almost never need but when I need it I can never find it. I made a custom holder for it so it would always be up there on the wall and I would never forget where it was. I need to upload this model.
The rest of the models on this wall are ones included in the OG Honeycomb storage wall. This includes the scissors, calipers, various pliers and screwdrivers. None of these are my favorite but I printed quite a few when I started setting these up. Will likely replace with more purpose made holders.
The Allen Keys are in their original case which has been screwed into HSW inserts.
Network / Computer Wall
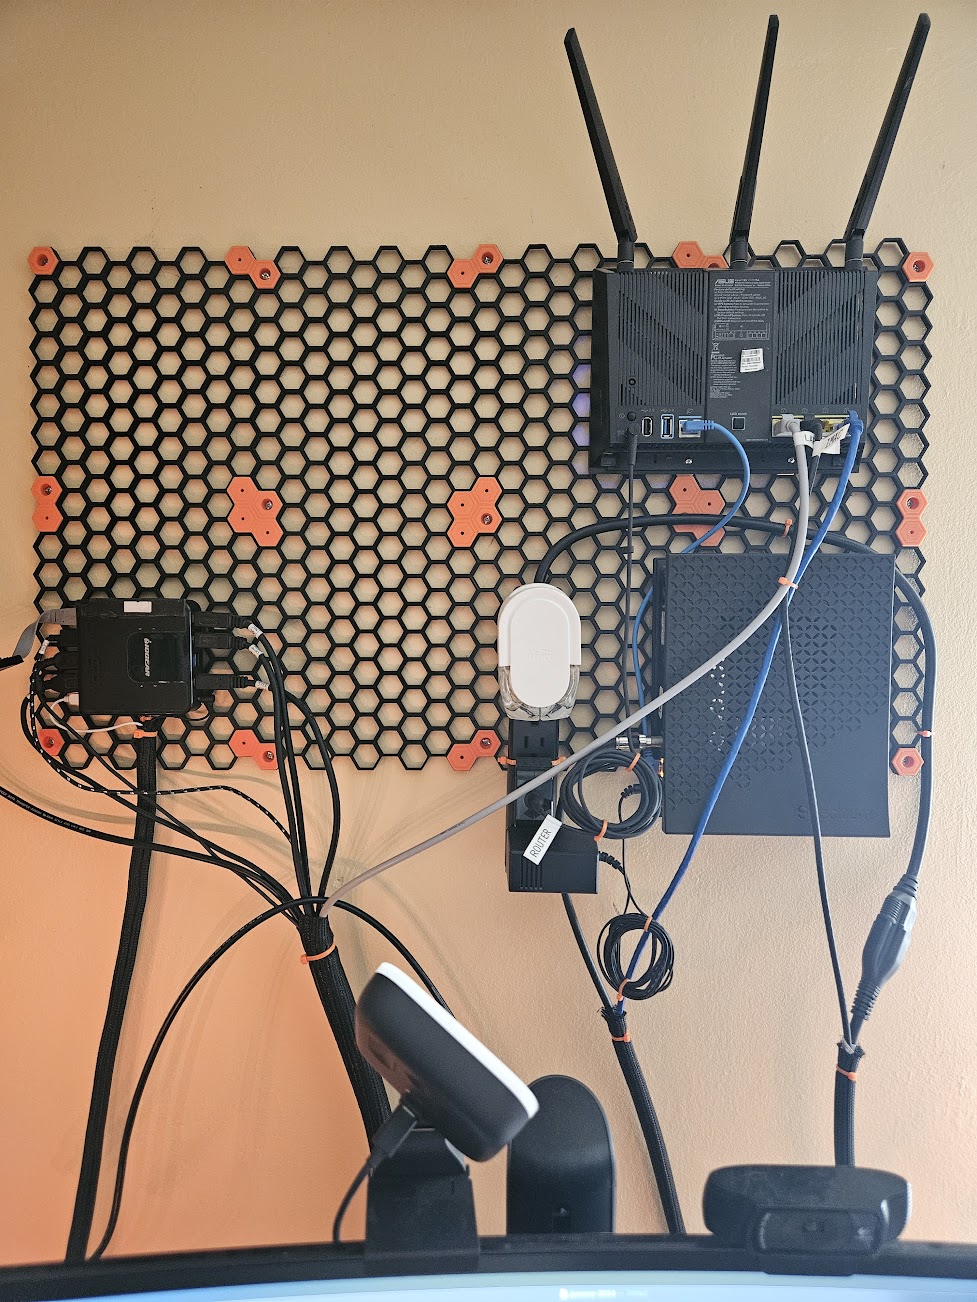
This wall consists of 8 panels, 4 single mounts, 8 double mounts
This wall is unique in that there are no HSW holders on it. All components are either zip tied to the wall or have been attached to HSW inserts.
Office Suppply Wall

This wall consists of 3 panels, 4 single mounts, 4 double mounts
Cup Holder and Cup for Honeycomb Storage Wall: Yet again the removable cup comes thru to hold pencils, pens, markers, etc.
HSW Cup Holder: Not optimal but there are two of these on this wall. One holds stapes and the other holds a glass cup with thumbtacks in it.
AA and AAA battery holder for Honeycomb Storage Wall: Battery storage. I need to mount the actual charger to this wall sometime but ran out of room, will probably extend downwards in the future.
Business Card Holder for Honeycomb Storage Wall: This holds my business cards.
HSW Cable Hanger: I printed two of these to manage the chaos of holding a variety of USB cables. It still looks pretty chaotic but there is normally a rolling cart in front of this wall (seen off to the left), so in practice it doesn't look that messy.
Easy Print Super Strong Hook - Single Piece - No Screws - No Supports - HSW Honeycomb Storage Wall: Of course there are more of these hooks. One is holding a back scratcher and the other is meant to hold a "reacher grabber" which is currently quarantined in my basement after being used to pick up dead mice :O
Stapler holder: This is a model I made, I'm not really happy with it so I haven't uploaded it anywhere. I may redesign and share someday, if I ever get sick of it, it works well enough so I'm not super motivated.
Record Wall
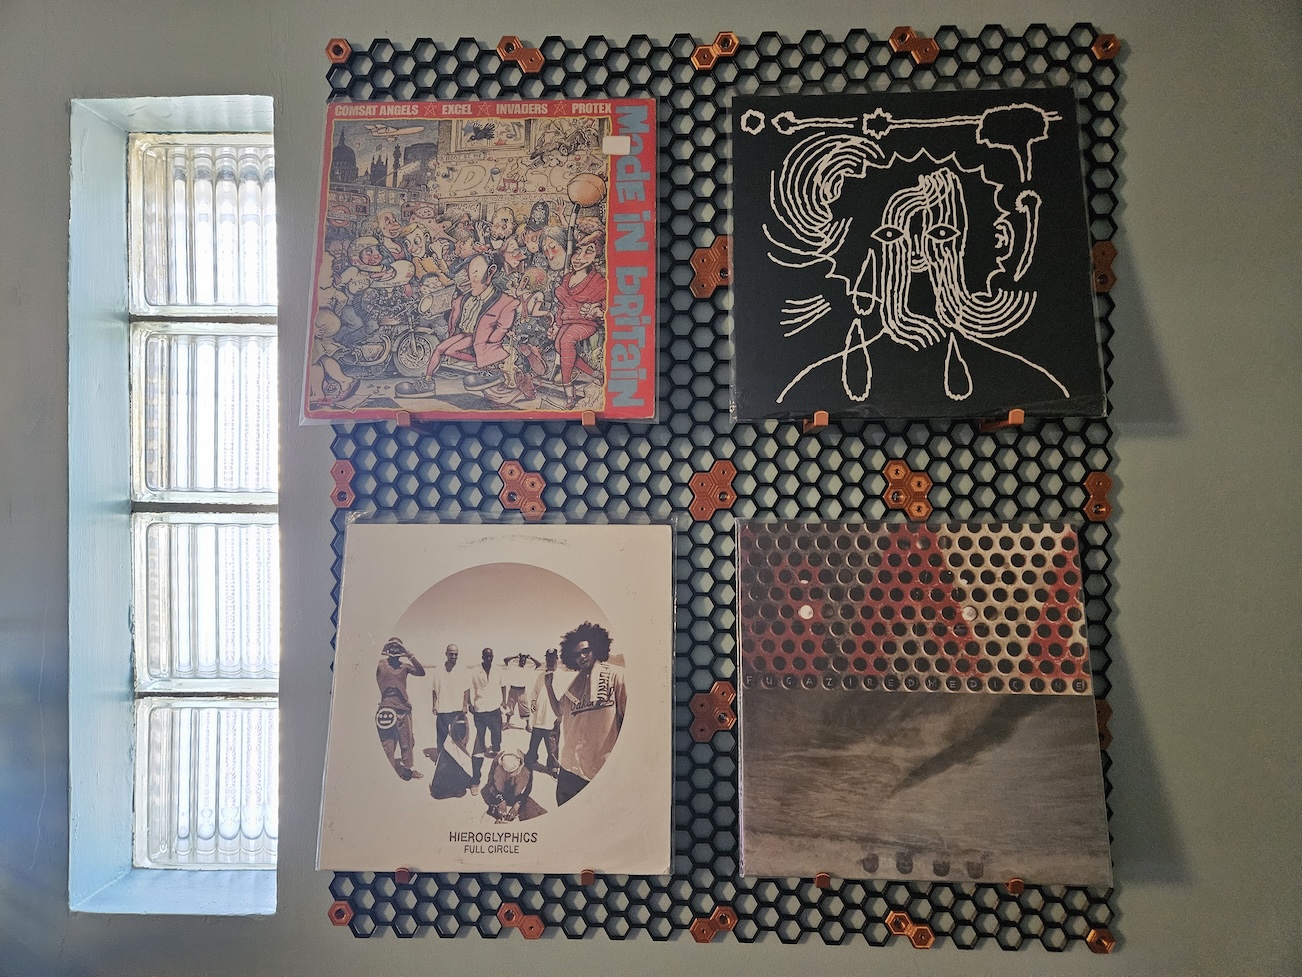
This wall consists of 16 panels, 4 singles mounts, 12 double mounts, 9 quad mounts
Unlike the other walls I used a bronze silk PLA for the mountable pieces.
Easy Print Super Strong Hook - Single Piece - No Screws - No Supports - HSW Honeycomb Storage Wall: The hero of this whole page is back. I am using 60MM "super strong hooks" to hold up my records. The nice thing about this is that each quadrant can hold several records, often in a listening session I will put the records I am listening to on the hooks after and end out with 5 or so on there. No weight issues so far.
A Brief Cost Analysis
I was curious after printing all these panels what the cost was compared to Pegboards and Skadis. I don't think cost savings should really be a motivating factor for adopting HSW. It requires a well calibrated 3D printer and a lot of time. Furthermore, to get the most out of HSW, you really need to know CAD so you can make your own holders or modify existing ones. The cost is still interesting to consider tho.
In this analysis I am going to consider the cost of the panels only. Maybe someday I'll go thru every model I have printed and figure that out too.
I normally use HatchBox filament which has averaged $25.40 per 1000 grams. I am not taking the cost of electricity into account here, just filament costs.
| Part | Slicer Settings | Time To Print | Filament Used (grams) | Cost ($) / Unit | Units Printed | Total Cost | Total Time |
|---|---|---|---|---|---|---|---|
| wall-honeycomb-224x190size(mk3s).stl | 0.30mm DRAFT @MK3 | 4h24m | 77.68 | 1.97 | 55 | 108.35 | 10 days, 2 hours |
With that in mind we can look at the cost of a 30x22 Skadis board and a steel pegboard to figure out the cost per square foot. We get:
| Panel Type | Cost per Square Foot |
|---|---|
| Honeycomb Wall | $4.30 |
| Skadis | $6.07 |
| Peg Board | $7.80 |
So the cost of HSW is indeed cheaper, though I'm certain the cost of peg boards can be severely reduced by shopping around or making your own.